Tuesday, July 6, 2010

Cont. Module 3

So, I've been very bad and it's been a long time since my last post. I can't remember as well how each project was done, so descriptions will probably be shorter. Enjoy though!

PROJECT 41


As I had mentioned in my last post, this ring was the same casting as in project 36. This time we had to use triangular stones. There is a term "trillian" although those stones have more of a bowed out side than straight edge. Basically the same process as before. Made one wall thinner. Then cut in seats, a little tricky based on how far apart you want the stones to be. Tap over the thinned out wall. Bevel the edge of the thicker wall and tap that one as well. Rather than just leave the shape as is, I went for something different and filed to follow the outside edges of the end stones.

PROJECT 42


This type of setting is called a half bezel. Started off with soldering a sheet into a tube shape. Bent/hammered into shape to fit the stone. Cut the half circle shapes into the sides. We had a choice of making this into a pendent or a ring, so I made a nice shank and soldered the bezel into it. Because the metal of the bezel is so thick, it's not a simple fold over job like with a regular bezel. It's more like channel setting. Had to cut seats into the sides, thin out one wall to tap over, and bevel the edge of the other wall to be able to tap in that side. I actually had an oops moment when working on this piece. The shank I made was a little too thin at the seam. When I was tapping over one of the walls, the shank snapped at its solder seam. I tried to re-solder without taking my stone out, but the heat cracked it in the end. So I had to take the stone out and reset. But, it came out alright anyway.

PROJECT 43


This was just practice to learn how to do pave. I think we used 2.5 mm stones. Basic strategy is to etch lines on the flat surface and mark out even placement of the stones. Drill holes where each stone is to be set. Then using a ball-bur made the hole wide and deep enough to fit the stone. Used a heart bur to cut a seat low enough so that the girdle of the stone sat just below the surface of the metal. Then using a beading tool, push the metal into little beads around the edges of the stones to hold them in place. The inside edge of the triangle was made smooth and angled in by a rubber wheel. The rim of the edge was ridged by a tool called mill-grain.

PROJECT 44


The process of this project was called bead and bright cut. This was just practice, hence, the copper. Basic idea was to first drill a hole and bur out a space for the stone, then cut into the silver angled in until you're left with the "prongs" that will eventually hold the stone. A lot more steps than I felt was necessary went into creating those flat angled sides, but so it goes. Setting involved putting the stone in and making sure it was low enough. Used the beading tool again to push the metal into a bead over the edge of the stone. Mill grained the edges of the square.

PROJECT 45


This is called an eternity band. Essentially used the bead and bright cut technique only into a ring band. It was good practice.

I'm done with writing down project numbers. Anyway, I started on learning how to make wax patterns.
Basic 'D' Blank


Initial Ring (decided I might as well just write my name out already)


I actually got to cast this one, so, here's the finished product:


Scroll Ring


Signet Ring


Build Up


I had a lapidary workshop, which is learning how to cab stones (make into the cabochon shape). These are my pretty babies:
This was day one's product. We were just learning how, so I went through all the steps on just the one. I did however begin to draw the shapes out on the other pieces of agate I wanted to work on and get the rough cut out of the slabs.
Kind of makes you think of Grand Canyon or any other mountain-desert area.


Day 2 was a little more productive. Completed two cabs and fully cut out the shapes of the other stones I wanted to work on.
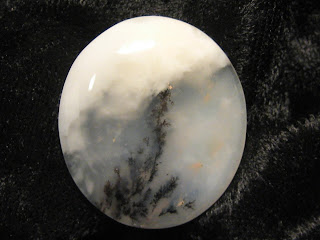

It's snow falling on cedars!


Day 3- the rest of the stones I worked on, rather than doing each one all the way through, I went step by step through all of them at a time. I also skipped a step involving "gluing" the cab to a stick to make it easier to hold as you grind away the sharp edges and smooth the stone out. It involved sacrificing some fingernails, but it was totally worth it!!
I call this one the Eye of Sauron. I'm a dork, you know it.

A little more egg shaped than the others.


The following pictures are two sides to the same stone, so, a double-cab:


I liked the hint of yellow glowing in the center.


 So, yeh, this was a very very productive workshop.


And now, to show some of the pieces of jewelry that I've made on my own time. Tuesday nights and Friday afternoons we're allowed to stay late and work on projects not related to schoolwork. I started getting into working with copper. Piercing the pieces, and then blow-torching the bitches up to get awesome coloration in the metal. And because of that firing, the colors don't oxidize and turn dark. Only one piece has started to do that- the swirl design. It's because the top layer was textured and non-torched copper exposed to the air will turn dark.
This is a cloak pin. It needed to be heavy enough to hold my cloak together, so the metal is pretty thick. But check out that red background! Two layers of copper were used. The top, pierced layer, was domed out before I soldered it to the base.
This was the first piece I discovered the firing technique for. Because the metal was so thick, I was having a hard time soldering the dome to the base with my tiny torch. So I took it into the back room and used the torch normally used for melting down metal. For the solder to finally flow, the metal ended up getting quite hot (turning hot metal red), and then I quenched it. What came out of it was all these awesome colors.

Again, two layers of metal. Top is pierced, soldered to a base. Every time I do a different piece, the colors come out different.

Once again, domed and pierced soldered to a base.


There's another circle on the other side of the center circle that you can't see. Wrist cuff. It looks like leather until you see it really up close. The beads are silver.


Sunday, April 25, 2010

Module 3

PROJECT 39


This is the 9 crown cluster project. We could either attach it to a ring or make a bale and have it as a pendant. I obviously went the route of ring. Anyway, to begin we were given 9 crowns. I can't find a picture of the tool we used, mostly because I don't know what it's called- but we were given a tool that holds the crowns in place upside down so we can solder them together. Started off with soldering 3 rows of 3 crowns. The shape of this holder is concave. When held right side up, the crowns then look curved, center crown being taller than the one on either side. Placed the 3 rows of crowns back on the tool and soldered them together. Rolled out a simple band, added lines that wrapped around the band so it wasn't entirely plain. Soldered the cluster of crowns to the band. The prongs that we were given had seats pre-cut into them. So, I put all my stones in, and, because of some imperfections in how I soldered the crowns together, some of the stones looked crooked and awkward. Then, while setting, broke half a prong. Salvaged it by using a ton of soft solder to build the tip back up. Because of the awkward sitting of some stones, had to take them out, cut the seats in certain prongs down a bit, reset, gave a final polish, and called it done. Didn't think I would like such a bling-y ring, but it's kind of awesome.

PROJECT 40


This is another exercise in channel setting, this time using baguette czs. For this one in particular, one side wall was filed to about half its thickness. The other untouched wall had the notches cut into it for each stone. Because of the shape of a baguette we had to cut a sort of v-shaped channel into the metal for the stones' tapered edges to rest in. Like the other channel setting, popped the stones into place. I kind of broke a few when trying to get them in... That's the other thing- each stone is sliiiiiiiiightly different in size and you need to put the larger ones in the center. You break it, you need to find another stone similar in size, and we are talking fractions of a mm. But it actually makes a huuuuuuge difference. Also, in real world situations, I would not have the benefit of a whole slew of stones to pick from to set. I might be given stones by a client to set, and I had better NOT break them. Yeh. Going to need a little more practice obviously. After putting the stones in place very carefully used a hammer and tool to tap the thinned wall over the stones so that they would now be held in place. If set well, the stones will not wobble (mine didn't wobble. Woot!! God, now wobble is in my head and sounds weird. Wobble wobble wobble...). Next, filed away any scratch marks, and made sure that metal looked straight from a front view. Final polish and call it done. This ring in particular, although the stones are set nicely and actually sit straight, the band kinda sucks. The casting of this metal was not such a great casting- too much porosity in the metal, porosity meaning little tiny bubbles of air in the metal. In some cases when it's only one or two bubbles and they're not too deep, you can file them away. There is also a tool that can be used with the flex shaft that pushes metal into the holes- you'd still need to be careful in burnishing because burnishing takes metal away and not much is pushed into the holes in the metal. In this case, nearly the entire ring has little tiny air bubbles.


So, after this I started project 41 which had the same casting shape as project 36. This time though we are to use triangular stones. I cleaned up the ring all nice and shiny but suspended work on the ring to complete a commissioned necklace:
This, I'm really proud of. I recycled old jewelry. Took the metal, melted it all down into 3 pieces. Took longer than you would think to roll them flat to the thickness I wanted- about .5 mm, a little larger. Need to constantly reheat the metal or else it gets too hard to work with. The pieces on the end are actually one piece of metal rather than cutting 3 small ovals and soldering them together. I hammered them so each oval would be convex. The 3 individual pieces that hold stones took also a lot of work. There is filigree work in there as well which can be time consuming. All in all it was 41 hours of work from start to finish.
Basically, this is the reason why I decided to go down this path. To be able to take silver that was an ingot, roll out, cut, and pound it into submission- and have this come out of it, there is immense satisfaction. Even though I'm an amateur, I consider myself a jeweler now. I love my design, but I can't see the piece without seeing its flaws. It drives me a little crazy. Can't work on it anymore though- it's been shipped off and hopefully they will love it as much as I cared about making it. To get a better look, click on the picture.

Sunday, April 11, 2010

Finishing Up Module 2 and a Little Something Special

So, I finally have some good pictures up of my jewelry. Thank the macro setting on my digital camera for that. And thank Ginger for telling me about it! Some pieces I couldn't redo, like the ring with the 4 stone crown settings. That and my first copper band, which has been totally transformed. This was its in between stage:


PROJECT 32


This project was creating a bypass ring with a marquise setting. We had to create the shank ourselves. First step was creating the actual band, then we hammered flat the half of the band that had the solder seam. After that we had to saw the band back open. I decided to change the design we were given and folded the arms of the band in opposite directions and filed into points. I was kind of inspired by the letter alef. This was the first piece I actually sat and drew out a few designs finally coming up with this one before actually making it. A lot of what I've done before has just been organic as I go. Next step was soldering the marquise setting between the arms. Polish and set. Definitely proud of this one.

PROJECT 33


This little number is called a gypsy setting. It was pretty awesome. Check out the mirror finish! Anyway, we were given a raw casting to work on. File off the sprue, give it a good cleaning up. In order to make it appear as if the stone is embedded in the metal: we filed around the edge of the setting to create something like a built in bezel wire. Very carefully tap the metal over the edge of stone. After that we filed to make everything smooth, and then polishing galore. Short but sweet project.

PROJECT 34


With this one we had to learn how to create a plain band to match an existing one and solder them together without soldering them completely together. We also had to solder in the crown and set the stone after polishing.

PROJECT 35


I'm not sure why Frank my teacher had me do this project instead of setting the crowns onto the free-form butterfly/flower ring thing. But in any case, rather than do that I had to make my own band and solder on the 3 crowns and then set. There was some repronging and retipping done. Sizing up and then reshanking as well. With all the heating up of the band after setting the stones, because of resizing, etc, they got a little frosty. Meh.

PROJECT 36


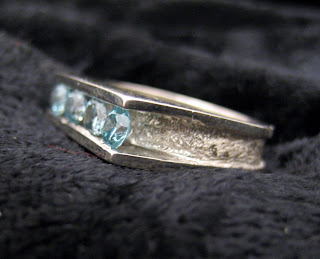
This was another wax casting we had to work with. I had fun working on the band. It was originally flat all the way around but instead I filed into the band to continue that curving indentation leaving a rim about the same thickness as the top of the ring. I also added texture to give it that frosted look. The next part of our task was to set the stones in what is called a channel setting. Had to carve notches into each side of the insides of the ring and pop the stones in. Totally had issues with it, mostly with creating the notches. But after finally setting the stones in, the rest was easier. Carefully tapped the metal around the stones so that they overlapped the tiniest bit with the stones. Filed the edges even. Was fairly pleased with the final product.

PROJECT 37


This one I'm also proud of. Wax casting that we were given to clean up and polish just like the other. This time we had to set these itty bitty stones. Applied the same notching principle from the straight channel to the bar channel setting. It's really pretty and simple. One of the few castings we've been given that I actually like as is, no alterations on my part.
Hardly worth mentioning but we had 2 chain repairs. Simple cable and curb link chains. I believe the curb link I worked on was a bit smaller.

PROJECT 38


This final project for module 2 was to do another cabochon bezel set pendent. I was given a second stone by a fellow student since she was using one of her own real stones for setting as opposed to the one they supply us with. I traded hers in so I could get one that matched with mine. Simple design. To get the texture I used what's called a ball bur. You just let it grind into the metal to create the hammered/dimpled look. I used two sizes, one larger and one much smaller. The head of the tool looks like a little pencil marking it's so small.

Here's something a little extra. We had a filigree workshop that was optional. People who've paid for modules 1-6 don't need to pay extra so I signed up. Amazing amazing class. I've always loved filigree but even more so now that I know how to make it. Not going to give descriptions on how they were made, just enjoy the pics:


Saturday, March 27, 2010

Off On A Tangent

Soooooo, taking a departure from the jewelry for a moment to share with you this most awesome weekend I just came back from. I went to an SCA event. In a nutshell, medieval/renaissance reenactment. You camp out, watch fighting, check out merchant's row and enjoy the general merriment making in the evenings. Did I mention we all get dressed up in period garb? I made my own cloak! Definitely uneven in some places and my hem is absolutely laughable, but it's my cloak and I'm totally stoked that it's something I made. I don't think I actually have a picture of me in the cloak.
Here's a picture of our encampment Rivenoak:


Our tents are in the center of the picture. The guy on the left is John, friend and fellow jewelry student.
We arrived Friday, in our mundane clothes, set up camp and eventually got into our costumes. Dinner happened and after dinner came the partying. There were drums and belly dancers and a little singing. Drinks and merriment all around.
Saturday was pretty awesome. Woke up, had breakfast, took a stroll down merchants row. Court was held. Basically at court there is swearing fealty to the king and queen and the realm. Also, passing off duties and titles from the retiree to the new person. Many huzzahs were shouted.


In the above picture the king was about to hand out to I believe they were his "personal" warriors, these coins that he had helped to fabricate to honor some people. The warriors went around displaying them before returning them to the king.
Fighting began around lunchtime. And by fighting I mean the tournament for declaring the new king for the next year. In a small field men fight one on one in the 4 corners. It eventually gets down to the final two and whoever wins is king. Awesome. Hopefully this link will work. RCA fighting
The occasional pauses in fighting are to determine which blows landed and caused "wounds".
Going back, after court before fighting was a demonstration of alectryomancy, or as they put it: ouija-chicken:


This was the practice of divination using the chicken to pick out letters to create a word. Needless to say, can't imagine it being very helpful. The chicken picked out FDRJX in answer to the question of who would win the tournament for king.
Saturday night there was more food, delicious homemade mead, homemade root beer, drums, dancers and some very naughty songs. Sung after the kiddies went off to bed.
Sunday was basically breaking up camp and going home back to the real world.
Probably the most fun I've had in a while.

Thursday, February 25, 2010

Cont. Module 2 (2 posts in as many days, shock!)

PROJECT 24
 
This is called a solitaire setting. Simple engagement ring style. We were given a plain pre-cast shank and the setting, also in raw form. We had to shape the shank so that it fit within the prongs of the setting, solder it together, and set the stone. Polish and make pretty. I decided to make it a little more fun by filing into the prongs. The tips are filed into points so it kind of looks like a six fingered claw holding the stone. I got a fun reaction out of one of my classmates for getting this little design in. Go me. 

PROJECT 25
 

Finally getting around to setting this damn ring that we've re-sized and re-shanked over and over. Anyway, setting just like the practice: drill a seat into the inside of each prong, settle the stone in, pull prongs in to hold the stone. Not making a bold for project 26- simple re-polishing of the free form ring. Yawn. Project 27 & 28 were to learn how to retip a prong that has been "worn down" and reprong in the case that it may have broken off. The crap picture you see is after all of that. Retipping is building up soft solder to give some height back to it, and repronging is soldering on another prong. Because of the broken prong (god I've said prong too many times, sounds like gibberish) a stone came out so that had to be reset.
Project 29 was to resize up or down (again!!) the free form ring. Since I was dissatisfied with the shank entirely, I replaced it.

PROJECT 30
 

This setting is called a round basket. First we had to roll out our own wire. The general idea of a basket setting is being able to set a stone of any size based on its diameter. There's a calculation and being me, rather than follow directions and use a special mandrel for sizing the jump rings that form the basket, I decided to do the math and measure out the length of the wire that way. I ended up with rings 1 mm larger than they were supposed to be. Ah well. Anyway, took 2 long pieces of wire, crossed them, and soldered them. When you bend them up starting a little bit away from the intersection, you get the 4 posts for soldering to the rings. Starting with the smaller ring you solder on the 4 posts on the outer edge (drilled into the outside sides of the ring and inside sides of the posts so that they linked together, log cabin style, soldered at those joints). Soldered the larger ring ~1.5 mm higher up the post from the smaller ring. Evened all the posts out until the correct height. Cut out the bottom cross section that held the posts at the bottom. Then created what is called a rabbit ear bail. Also improvised a little on that one. The object is to take 2 long pieces of wire, fuse them at either end (no solder used, just lots of heat, yay torches! You can tell I wrote this post late at night). Fold it in half. I then fused the tips together. The manual didn't say how to keep the bail closed so it could be inserted in between the two rings and not keep popping open. Anyway, fusing worked, soldered it to the basket, opened the wire to get the bunny ears bit. Set the stone- and by the way, the stone doesn't just sit on the top ring, you still have to drill seats into the prongs so that the stone can rest just above the ring. Can't see it, but filed my prongs pointy again. I like it so much better that way.

PROJECT 31
 

This project I liked. We had to create another basket, oval this time. Used the mandrel this time as well. Side view so now you get the idea of what the basket looks like from the side. Also created the shank from scratch literally. Started with scrap metal, melted it down, rolled out a square bar, flattened it a little, filed in the shape I wanted (vaguely circle shaped). Although, when I first tried to solder my basket to the shank, the posts melted, caved in, and died. Sigh. I was able to salvage the rings but had to repost. Second attempt was much better anyway- they were on straighter and didn't look bitten up to all hell. For soldering the posts the oval method was to create U shapes out of 2 pieces of wire and have each arm be a post. That way the posts extended past the bottom of the smaller ring. Good thing for me because on recommendation from the woman who sits next to me, I drilled spots for the posts to rest in on either side of the shank, securing it. Made it really easy to solder the basket to the ring, just soldered those joints. File the bottom of the posts and it looks fine. Ignore the little pearly things, those are just the pins holding the ring up. As of this blog-posting this is my latest complete project, so now we're all on the same page. Huzzah!!

Tuesday, February 23, 2010

Cont. Mod. 1, Beginning Module 2

PROJECT 14
 
To make these earrings I first started out with 2 tiny circles of metal. There's this awesome cube that you slide a sheet of metal into. There are sharp edges so when you slide the bar into the hole and give a good strong whack with a rawhide mallet, you pop out a circle. Next there is a tool called a dapping die. You place the piece of flat metal into the depression in the cube and tap it spherical using a dapper. Drilled a tiny hole next into the top of my little domes. Cut wire I already had, soldered it in place through the hole. The bead was 1/2 drilled, so next step was using some epoxy glue to secure the post and dome to the bead. Filed the edges smooth, some polish, and voila, ball stud earrings.

PROJECT 15
 

This was a fun one. We were given a square piece of metal as a base, and a long rectangular piece called bezel wire, of fine silver rather than sterling. The first objective is to wrap the wire around the cabochon stone (flat back) to get the correct length needed. Next step we soldered the wire to the base. I melted mine at the seam. Woops. So, forging ahead I just cut myself a new bezel wire. Also ended up using a different piece of metal for my base. The pre-cut square given to us wasn't large enough around for what I wanted to do later on. Successfully soldered the bezel wire on my second try. Rather than just file all the edges completely down, I made a fun design using simple needle files (very handy those). Cut out, shaped, and soldered on the bale (what the chain threads through). Polish piece, and then finally place the stone in the setting (always the last thing to be done). When I tried to push the top edges of my bezel wire in I couldn't for the life of me get it. Took it over to Frank, who also tried, and commented on how hard it was. "Is this fine silver?" Ahhh, no. Fine silver is supposed to fold in like butter, sterling, not so much. Frank used a special dapping tool that goes into the flex shaft and that gives way more power to the tapping motion to push the bezel wire in.

PROJECT 16
No pictures, taking the rings from before and re-sizing again. Down 2 sizes.

PROJECT 17
No pictures, size up both rings 3/4 size.

PROJECT 18
Only needed to reshank one ring- I chose the prong setting ring.

PROJECT 19 & 20
Chain repairs #5 and 6. #5 was another box chain, easy peasy. #6 was similar to what is called an idiot's delight chain. Where my teacher cut the links for me to repair ended up actually soldering pretty easily after finally getting used to soldering really small spots with not too much solder. I can see how it would be a problem- using too much solder and you end up with solid links.

PROJECT 21


Called a prong plate. When it was first finished there were 11 prongs in total, and standing up more or less straight. Take a flat sheet of silver, solder on silver wire. Basic skill was to learn how to solder wires like that close together without melting the one you did before. I used up some prongs for a future project.

PROJECT 22

This was practice setting. We had to take the crown settings provided to us, solder them to the copper base, and then set the stone. A channel is cut into the top of each prong on its inner side. Place stone, bend prongs in. Round off the tips. Did 5 in total.

PROJECT 23
 

Simple 4 prong stud. Each crown does not come with a solid bottom. To fill it in, we had to create a ball of silver and solder that into the hole, then file flat. I used prong from the prong plate to create the beads (apply torch to wire until wire melts and balls up on its own). Next solder on the post to the back. Make setting shiny and pretty. Set stone in the same way as practiced. Remove any scratches, ensure sparkliness and call it done.

The New Adventure

It's mind boggling that it has already been one month since I've started my program. It's flown and will probably only seem to go faster. I've already learned so much. And it's fun too! No matter how tired I am when I wake up, after getting to class and beginning work, time just passes by. I look up from my work and it's lunchtime, and after that, I look up again and it's time to go. I enjoy being there. I can't say I've ever been this happy to learn something.
I have taken pictures of what I've done so far. Some are better pictures than before, but again, still not getting the lighting quite right. In any case I do have a picture of the only nice part of my bedroom:
 
And my lamp:


Why do I put a picture of the lamp? It's just a lamp. But, I designed it. It was a plain white lampshade and I bought some fabric markers. Drew out a design in pencil, followed up with the black outline, and went in with the colors. And enjoyable little project. Here's a composite image of the whole lampshade (not a perfect lineup of the pictures, but the best I could do).
  
So, I've put up some pictures of what I've done so far, but I hope to replace them (again) with better images. I've described a little bit for some of the projects how they're done, but have left out a bunch of steps. There are certain procedures that are done when you're manipulating metal- rolling it out, forging it, etc. All the work on the metal hardens it up, so to make it more malleable again you do what is called annealing: apply flame to metal until it just starts to glow (copper gets kind of cherry red, silver glows a deeper red). Then as soon as you see that glow, you quench in water. Within one project a piece of metal goes through multiple annealing.

PROJECT 1


This is just a simple copper ring, wedding band style. It's already started to oxidize so it looks kinda nasty. It looks a lot better after it's just been burnished. Basic skill we learned with this project: obviously how to solder and shape a ring. Also how to get the curved edges to give the ring its rounder appearance (simple needle files).

PROJECT 2
 

Another copper band. Skill learned was how to create the shape in the ring. Again, looks much better just after it's been burnished. In order to do this we divided the width of the band into thirds. We used a jeweler's saw (and yes the blades are that small) to create 2 lines circling the band, sawing only as deep as the thickness of the blade, which isn't thaaat thick. Then we used our needle files to file the angle into the ring. The center section then had its square edges filed round.

PROJECT 3


These 3 pieces were a lesson in taking a piece from its raw casted state to "store ready". When we first received them they had the remnants of what is called a sprue. When it's in its wax form this is the piece of wax that attached the ring to the "tree". To give a visual I found an example:


Eventually we'll learn how to do this- carving the wax rings, making the wax tree, attaching the wax rings to the tree, making the mold, melting out the wax, and then casting the metal into the mold. Anywho, after casting is finished all the rings are cut off the tree, the sprue still attached. Our project was to file down the sprue, make sure everything was even, and shine the buggers up, aka store ready. 

PROJECT 4 
The piercing project- basically learning how to cut out an image into a piece of metal. Make a pendant out of it. I got to skip this project. Because I'm just awesome like that. Actually, mostly because I already proved I could accomplish this skill successfully when I came to visit and they allowed me to make a piece of jewelry of my own, which some of you have seen in person:


PROJECT 5
 

The rope chain bracelet. This project was really involved. We started with raw pellets of silver, melted them into an ingot about 3 inches long, bar shaped, maybe 4-5 mm thick. Then, using a special press we rolled it out into a square shaped wire a little under 2 mm thick. With all the pressing the metal into a thinner shape, the metal got longer and turned into wire. Then using what is called a draw plate we pulled the wire through the holes to change the wire from square shaped to rounded and down to 1 mm thick. Next we took the wire and coiled it up tightly around a flat piece of metal. When we slid the coil off the metal it was tight, like a spring. Took the jeweler's saw blade and sawed straight down the coil to get all the jump rings. Next came all the intense amounts of soldering links into each other to make the bracelet. Definitely good practice. We also rolled out a flat sheet, cut the shapes for the end tabs that get soldered onto the ends of the chain. And the shapes for the "sister hook" clasp. After assembly is finished, the burnishing and rouging came next.


PROJECT 6 & 7
No pictures for this- 2 chain repairs. First one was definitely easiest, a simple box chain probably about as thick as the one shown (2 mm). Got it on my 4th try. And second drove me a little crazy. Loose rope chain. Sort of like the one pictured, only thinner. The links were sooooooo thin. I kept melting the chain before the bead of solder could flow. I started with a chain about 6 inches long and by the time I finally got it, I had had to cut off about 3 inches of failed attempts.

PROJECTS 8 & 9
Again, no pictures. For these two we took the rings that we had previously shined up and made store ready. First we sized each one down 1 size (2.5 mm). Basically cut out 2.5 mm of the shank (body of the ring) and solder it together. To be considered complete the rings had to be shined up again (applying heat, soldering, throwing into pickle, etc, makes the ring lose all the sparkly). Next, we took the same rings and sized them back up 1 size. That required rolling out a piece of metal that was square shaped to be a little thicker than the shank itself. We sawed the ring open at the old solder seam. 2.5 mm of this square bar was to then be soldered into the opening in the shank. Since the insert was thicker, it had to be filed down to match the shape of the rest of the ring. Again, had to be shined up to be considered complete. 

PROJECT 10
Chain repair #3. Even though I did this one more recently, I cannot for the life of me remember what kind of chain it was. All I know is that it was waaaaaaay easier than #2. 

PROJECT 11
We once again used the rings but this time we reshanked them entirely. That means cutting off the main body of the ring and soldering a new one on. Also, we had to make sure hen completed it fit out own finger. Everyone calls it a butterfly, but I call it a flower. Anyway, that ring was fairly simple in taking some leftover square wire from sizing it up and using that as my new shank. The other ring though, because of its shape, needed a flatter piece of metal so that it could remain wider closer to the setting, and then be filed thinner towards the base of the ring. I had some leftover flat as well, but it was a weeeeee bit too short in the end. The ring ended up measuring about a 1.5 which did not even get past my pinky knuckle. There is a method to stretching the metal out and making the ring larger. Placed the ring onto the mandrel, tapped the shank back and forth using a ball peen hammer. In order to get an even amount of tapping you have to constantly flip the ring over. Anyway, I managed to tap it up to a size 4.5, finished filing into its correct shape, and shined the sucker up.

PROJECT 12
 

This was the first project I felt I could really take personal creative liberty with. The drawing in our manual just has the forged earrings as a simple circular hoop. I decided to give it my own twist. For this project we again had to measure out square lengths of wire at a certain thickness. Forging is using the ball peen and hammering the metal flat. When you hammer on the outside edge the metal curves into a circle. There is a press in the shop for shaping metal into rings and I used this to start the process of curling the end in rather than it just be a plain circle. The rest I just did by hand using 1/2 round pliers. Next had to pull some wire in order to make the posts, soldered them on. The tail end of the earring was originally squared off, but again, did something different. I filed them into points. To get the detailing on the metal I improvised with what I had- I used something called a center punch. This tool is normally used to punch an indentation into metal as a groove to rest a drill bit in when needing to drill a hole. Pressing the tool down all the way gets you the larger indentation. Carefully pressing down a little, you get the smaller mark. Needless to say I experimented on some scrap metal before going for it on the earrings. Still managed to make a couple of mistakes (pressing too hard). In order to get the design to show up more I painted on some patina (a sulfur mixture). I let it get really black, applied some flame to bond it. Then carefully burnished off the patina so all that was left was the black in the marks.
I totally feel like a bragging teacher's pet, but the instructors really liked what I did. Yoko said she'd never seen anyone else do that before with this project in terms of curling in the ends and pointing them. I also feel like such a 5 year old, but out grade sheet has E for excellent, P for pass, and I for incomplete. Frank, the teacher who has been recording my grades has been giving me Ps, which is great. For this project though he was really impressed and even said excellent. I think he doesn't realize that the grading sheet has the possibility for Es. I remember Yoko even mentioned to me that they used to only use P and I, but for some reason added the E recently. And I really want an E for this. Again, I'm 5 not 24, really.

PROJECT 13
Chain repair #4: rope chain about that size.
I hope you guys liked hearing about what I've done so far. I'll try (again) to get up better pictures.