PROJECT 41
As I had mentioned in my last post, this ring was the same casting as in project 36. This time we had to use triangular stones. There is a term "trillian" although those stones have more of a bowed out side than straight edge. Basically the same process as before. Made one wall thinner. Then cut in seats, a little tricky based on how far apart you want the stones to be. Tap over the thinned out wall. Bevel the edge of the thicker wall and tap that one as well. Rather than just leave the shape as is, I went for something different and filed to follow the outside edges of the end stones.
PROJECT 42
This type of setting is called a half bezel. Started off with soldering a sheet into a tube shape. Bent/hammered into shape to fit the stone. Cut the half circle shapes into the sides. We had a choice of making this into a pendent or a ring, so I made a nice shank and soldered the bezel into it. Because the metal of the bezel is so thick, it's not a simple fold over job like with a regular bezel. It's more like channel setting. Had to cut seats into the sides, thin out one wall to tap over, and bevel the edge of the other wall to be able to tap in that side. I actually had an oops moment when working on this piece. The shank I made was a little too thin at the seam. When I was tapping over one of the walls, the shank snapped at its solder seam. I tried to re-solder without taking my stone out, but the heat cracked it in the end. So I had to take the stone out and reset. But, it came out alright anyway.
PROJECT 43
This was just practice to learn how to do pave. I think we used 2.5 mm stones. Basic strategy is to etch lines on the flat surface and mark out even placement of the stones. Drill holes where each stone is to be set. Then using a ball-bur made the hole wide and deep enough to fit the stone. Used a heart bur to cut a seat low enough so that the girdle of the stone sat just below the surface of the metal. Then using a beading tool, push the metal into little beads around the edges of the stones to hold them in place. The inside edge of the triangle was made smooth and angled in by a rubber wheel. The rim of the edge was ridged by a tool called mill-grain.
PROJECT 44
The process of this project was called bead and bright cut. This was just practice, hence, the copper. Basic idea was to first drill a hole and bur out a space for the stone, then cut into the silver angled in until you're left with the "prongs" that will eventually hold the stone. A lot more steps than I felt was necessary went into creating those flat angled sides, but so it goes. Setting involved putting the stone in and making sure it was low enough. Used the beading tool again to push the metal into a bead over the edge of the stone. Mill grained the edges of the square.
PROJECT 45
This is called an eternity band. Essentially used the bead and bright cut technique only into a ring band. It was good practice.
I'm done with writing down project numbers. Anyway, I started on learning how to make wax patterns.
Basic 'D' Blank
Initial Ring (decided I might as well just write my name out already)
I actually got to cast this one, so, here's the finished product:
Scroll Ring
Signet Ring
Build Up
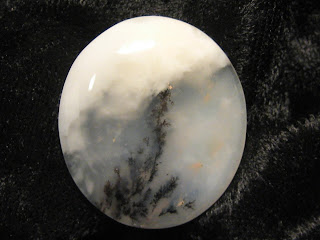
I had a lapidary workshop, which is learning how to cab stones (make into the cabochon shape). These are my pretty babies:
This was day one's product. We were just learning how, so I went through all the steps on just the one. I did however begin to draw the shapes out on the other pieces of agate I wanted to work on and get the rough cut out of the slabs.
Kind of makes you think of Grand Canyon or any other mountain-desert area.
 Day 2 was a little more productive. Completed two cabs and fully cut out the shapes of the other stones I wanted to work on.
 It's snow falling on cedars!
 Day 3- the rest of the stones I worked on, rather than doing each one all the way through, I went step by step through all of them at a time. I also skipped a step involving "gluing" the cab to a stick to make it easier to hold as you grind away the sharp edges and smooth the stone out. It involved sacrificing some fingernails, but it was totally worth it!!
I call this one the Eye of Sauron. I'm a dork, you know it.
 A little more egg shaped than the others.
The following pictures are two sides to the same stone, so, a double-cab:
I liked the hint of yellow glowing in the center.

So, yeh, this was a very very productive workshop.
And now, to show some of the pieces of jewelry that I've made on my own time. Tuesday nights and Friday afternoons we're allowed to stay late and work on projects not related to schoolwork. I started getting into working with copper. Piercing the pieces, and then blow-torching the bitches up to get awesome coloration in the metal. And because of that firing, the colors don't oxidize and turn dark. Only one piece has started to do that- the swirl design. It's because the top layer was textured and non-torched copper exposed to the air will turn dark.
This is a cloak pin. It needed to be heavy enough to hold my cloak together, so the metal is pretty thick. But check out that red background! Two layers of copper were used. The top, pierced layer, was domed out before I soldered it to the base.
This was the first piece I discovered the firing technique for. Because the metal was so thick, I was having a hard time soldering the dome to the base with my tiny torch. So I took it into the back room and used the torch normally used for melting down metal. For the solder to finally flow, the metal ended up getting quite hot (turning hot metal red), and then I quenched it. What came out of it was all these awesome colors.
Again, two layers of metal. Top is pierced, soldered to a base. Every time I do a different piece, the colors come out different.
Once again, domed and pierced soldered to a base.
There's another circle on the other side of the center circle that you can't see. Wrist cuff. It looks like leather until you see it really up close. The beads are silver.


