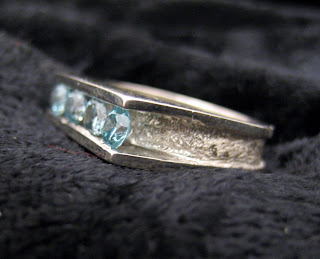
So, I finally have some good pictures up of my jewelry. Thank the macro setting on my digital camera for that. And thank Ginger for telling me about it! Some pieces I couldn't redo, like the ring with the 4 stone crown settings. That and my first copper band, which has been totally transformed. This was its in between stage:
PROJECT 32
This project was creating a bypass ring with a marquise setting. We had to create the shank ourselves. First step was creating the actual band, then we hammered flat the half of the band that had the solder seam. After that we had to saw the band back open. I decided to change the design we were given and folded the arms of the band in opposite directions and filed into points. I was kind of inspired by the letter alef. This was the first piece I actually sat and drew out a few designs finally coming up with this one before actually making it. A lot of what I've done before has just been organic as I go. Next step was soldering the marquise setting between the arms. Polish and set. Definitely proud of this one.
PROJECT 33
This little number is called a gypsy setting. It was pretty awesome. Check out the mirror finish! Anyway, we were given a raw casting to work on. File off the sprue, give it a good cleaning up. In order to make it appear as if the stone is embedded in the metal: we filed around the edge of the setting to create something like a built in bezel wire. Very carefully tap the metal over the edge of stone. After that we filed to make everything smooth, and then polishing galore. Short but sweet project.
PROJECT 34
With this one we had to learn how to create a plain band to match an existing one and solder them together without soldering them completely together. We also had to solder in the crown and set the stone after polishing.
PROJECT 35
I'm not sure why Frank my teacher had me do this project instead of setting the crowns onto the free-form butterfly/flower ring thing. But in any case, rather than do that I had to make my own band and solder on the 3 crowns and then set. There was some repronging and retipping done. Sizing up and then reshanking as well. With all the heating up of the band after setting the stones, because of resizing, etc, they got a little frosty. Meh.
PROJECT 36
This was another wax casting we had to work with. I had fun working on the band. It was originally flat all the way around but instead I filed into the band to continue that curving indentation leaving a rim about the same thickness as the top of the ring. I also added texture to give it that frosted look. The next part of our task was to set the stones in what is called a channel setting. Had to carve notches into each side of the insides of the ring and pop the stones in. Totally had issues with it, mostly with creating the notches. But after finally setting the stones in, the rest was easier. Carefully tapped the metal around the stones so that they overlapped the tiniest bit with the stones. Filed the edges even. Was fairly pleased with the final product.
PROJECT 37
This one I'm also proud of. Wax casting that we were given to clean up and polish just like the other. This time we had to set these itty bitty stones. Applied the same notching principle from the straight channel to the bar channel setting. It's really pretty and simple. One of the few castings we've been given that I actually like as is, no alterations on my part.
Hardly worth mentioning but we had 2 chain repairs. Simple cable and curb link chains. I believe the curb link I worked on was a bit smaller.
PROJECT 38
This final project for module 2 was to do another cabochon bezel set pendent. I was given a second stone by a fellow student since she was using one of her own real stones for setting as opposed to the one they supply us with. I traded hers in so I could get one that matched with mine. Simple design. To get the texture I used what's called a ball bur. You just let it grind into the metal to create the hammered/dimpled look. I used two sizes, one larger and one much smaller. The head of the tool looks like a little pencil marking it's so small.
Here's something a little extra. We had a filigree workshop that was optional. People who've paid for modules 1-6 don't need to pay extra so I signed up. Amazing amazing class. I've always loved filigree but even more so now that I know how to make it. Not going to give descriptions on how they were made, just enjoy the pics:
Subscribe to:
Post Comments (Atom)


No comments:
Post a Comment